Setting Up a Hive
Setting up a Hive
This document describes how to set up a beehive and install a colony of bees. The two together (hive and colony) are called a Stock. The SBA Compensation scheme refers to Stocks.
Once you have decided what type of hive to use, with the advice of your beginner class mentors, you are ready to set up your hive and populate it. Complete hives are usually sold with a brood box and two supers, either in the flat (Ikea style) or assembled and frames and foundation can be included, again either in the flat or assembled. It is best to budget for a second hive, at least a floor, broodbox, crownboard, roof and deep frames and foundation, in case it should be needed next season for artificial swarming.
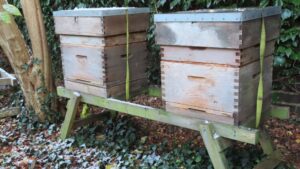
The hive should be located on a firm stand, ideally ensuring that the hive floor is some 40cm above the ground. It is a good idea to make a stand suitable for holding two hives with sufficient space between them for a roof to be laid down. See diagram below.

The stand should be located on a firm base, ideally on 20cm x 40cm sections of paving slabs. Ensure that all is level.
If you are using a single hive stand, again it is best to place it on a square paving slab to prevent the stand legs from sinking into the ground.
The stand should be located so that the hive entrance(s) will face south or southeast to catch the morning sun.
Allow sufficient space behind the stand for the beekeeper to stand when manipulating. If using a single hive stand, leave sufficient space to place the upturned roof at least 40 cm behind the hive, again to allow beekeeper movement during manipulation. Avoid placing the roof and supers at the front of the hive during manipulations in case a young queen should take flight. If the roof/super is placed at the front of the hive, she would most likely enter the super as she returns home.
Your first colony will probably arrive on 5 deep frames, ideally on self-spacing Hofmann frames, and these should be placed in the centre of the broodbox. The broodbox should then be filled up with 6 frames of foundation, again on Hofmann frames. See Tech. Data Sht 18 on this website – Obtaining your first bees.
The crown board is placed on the broodbox and a feeder full of 50/50 sugar/water feed placed over the crownboard feed hole. Proprietary bee feed can be used if preferred. A weir-type rapid feeder should be used as these can be replenished without disturbing the bees. Either a 2 litre or 6 litre (English) feeder can be used. An empty super is placed above the crown board to provide space for the feeder. The roof is fitted, and it is advised to place a ratchet strap over around the hive (under the stand framework and over the roof). This will guard against wind or stray animals upsetting the hive. You now have a stock of honeybees.
Keep feeding until the bees have drawn the foundation, as they will need a broodbox full of drawn comb to store sufficient food for winter.
Check the bees no more than once per week to see how they are progressing. When checking observe the 5 rules of FEDSS – Sufficient FOOD, EGGS present, Any sign of DISEASE, sufficient SPACE and any sign of SWARMING (there shouldn’t be with a new colony and a new queen).
If your colony was supplied early in the summer and the stock is very productive and draws out most of the foundation into comb quickly, then you should remove the feeder (feeding must not occur when a honey producing super is fitted) and fit a queen excluder and a super full of foundation on Manley frames (the Manley frames have wider side bars which make them easier to uncap when harvesting your honey). In a good year you may be able to harvest a few jars of honey.
abr 2023